7/10 Tone with Charcoal 2 (Preview)

Using charcoal with pastels, erasers and other tools to explore tonal direction and more complicated subjects.

LESSON PREPARATION
Getting ready to view the lesson
If you are watching the video tutorial on a computer (eg laptop, interactive whiteboard, digital projector) you can view the PDF resources on the screen.
If you are watching the video tutorial on a television, you may want to print the Workshop PDF on this page ahead of time, from your computer.
This lesson, Still Life 7/10, contains the following:
Still Life 7/10 Lesson Overview
Still Life 7/10 Activity
Still Life 7/10 Extension
Still Life 7/10 Posters (available in PDF)
These are posters of the finished artworks as created in the episode. You can choose to view this on the screen or whiteboard, you can print in black and white, or colour, or all of the above.
MATERIALS USED IN THIS LESSON
Willow charcoal, compressed charcoal, white pastel, kneadable and plastic/vinyl eraser and torchon.


EQUIPMENT USED IN THIS LESSON
Drawing board, clips, easel, view finder and spot light


SUBJECTS USED IN THE VIDEO LESSON
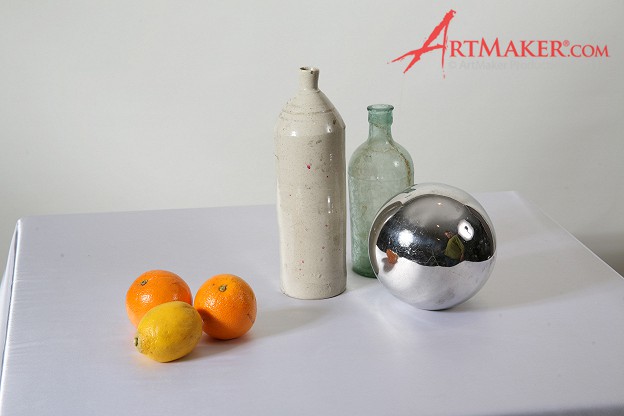
Assortment of fruit; e.g. lemons, glass bottle, metallic sphere, bottle.
1. We start by considering our composition, using a viewfinder. Make sure that strong elements don’t go out the corners, nor cut the centre of the page.
2. Keep looking through your viewfinder, as you gently draw broad and ghostly lines with the side of your charcoal, avoiding thick outlines.
3. Complex objects need investigating thoroughly with line, before adding tone.
4. Avoiding detail or nuance, establish the big shapes by blocking in tone that describes the background, negative spaces, objects, and the shadow shapes.
5. Squint at your subject to cut detail and see the essential picture.
6. The torchon can be used to even out the charcoal in the background.
7. The torchon also allows us to push the charcoal to make soft directional marks.
8. Directions can be drawn in with hatching lines or erased white lines, or drawn on white pastel lines, all of which could be softened with the torchon or an eraser.
9. A white line is just as instructive as a black line, and is a powerful way to describe the properties of light.
10. Erasing light marks back into the forms is useful for creating texture.
11. Dull surfaces have a gradual change from light to dark with a soft high-light.
12. Shiny surfaces have little build up to the highlight, which may be seen as points or sharp strips, often the light is on the edge.
13. Light effects can be cut into the charcoal with a sharp eraser. A soft kneadable eraser can be used to a build up soft radiant highlight, and drawing a brilliant spot of pastel white in the middle of this can depict a reflected light source.
14. Chrome objects usually reflect the room, which means the table, surrounding objects and dark background with piercing highlights can be seen in the object.
15. Squinting again and again to reduce the glare will help you work out what is happening with the highlights.
16. Don’t overplay the light details within shadows. Squinting will show how dark they really are.
17. Compressed charcoal is darker than willow, and can add strength to a willow charcoal drawing. The darker your darks, the brighter the whites will seem.
18. Adding line, either black or white, is the last phase of the drawing. This could be detail, or it could be hatching to strengthen the drapery.
19. A tonal drawing can be left at the tonal stage, or you could spend more time sharpening the details.
Set up a still life with a range of textures, glass bottles, silver teapot, oranges, bottles on a white drape which has folds and creases.
Light the table with a spotlight, this will encourage a dynamic result with good contrast. Looking through a viewfinder, lightly sketch in a line drawing, block in tone, finish with detail.
1. Choose a chrome teapot, start with a light outline from side of charcoal. Stand straight in front of the page, drawing from the shoulder. Rehearse the line several times, overall shape first, then internal ellipses. Next, line through top for handle and spout. Use a vertical check line to place the lid. Block in the tone, including the table. Blend with torchon, then add the highlights with an eraser. Use compressed charcoal for stronger darks and detail and white pastel for your highlights.
2. Developing only one object amongst many to full detail can produce impressive results. Leave the majority of the drawing at the line stage, while taking one or some to full detail. The early line drawing can be drawn forcefully then erased to leave a ghost image before the selected objects are drawn in full.
3. Rub coloured pastel onto the paper before you start with the charcoal to create an interesting bed of colour, this may only be in one section.
4. The entire drawing activity can be done with compressed charcoal, and white pastel, using the torchon and eraser to force/rub direction to the tone.
Video Tutorial


Download the PDF of this Workshop