6/10 Tone with Charcoal 1 (Preview)
Exploring the use of willow charcoal using simple subjects to create a tonal charcoal drawing without line.

LESSON PREPARATION
Getting ready to view the lesson
If you are watching the video tutorial on a computer (eg laptop, interactive whiteboard, digital projector) you can view the PDF resources on the screen.
If you are watching the video tutorial on a television, you may want to print the Workshop PDF on this page ahead of time, from your computer.
This lesson, Still Life 6/10, contains the following:
Still Life 6/10 Lesson Overview
Still Life 6/10 Activity
Still Life 6/10 Extension
Still Life 6/10 Posters (available in PDF)
These are posters of the finished artworks as created in the episode. You can choose to view this on the screen or whiteboard, you can print in black and white, or colour, or all of the above.
MATERIALS USED IN THIS LESSON
Willow Charcoal, kneadable and plastic or vinyl erasers.


EQUIPMENT USED IN THIS LESSON
Drawing board, clips, easel, view finder and spot light.


SUBJECTS USED IN THIS LESSON
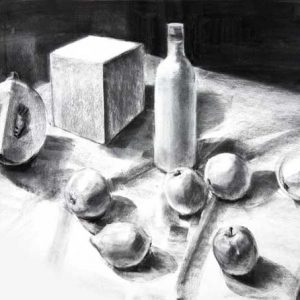
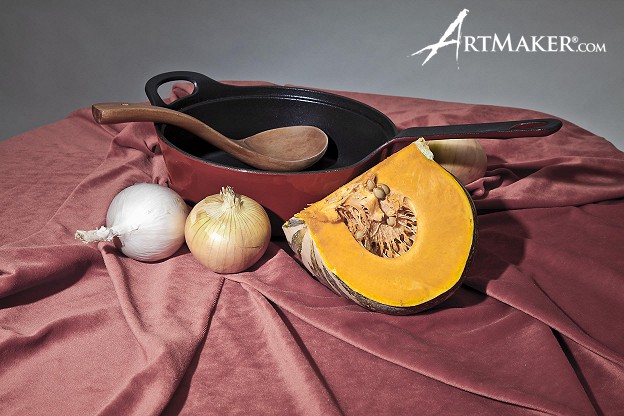
Assortment of fruit; e.g. apples & oranges, wine bottle, pumpkin wedge, wooden cube.
1. A tonal drawing is simply a study of light and dark on objects, and how light can be used unify a drawing. We will avoid using directional tonal marks and lines in this exercise.
2. Using a play of contrast and variations of soft & sharp edges, we can create the illusion of depth.
3. We can explore two methods of drawing in this tutorial; first an additive method with minimal erasing, and then a subtractive method where a base of tone is laid down and then erased into. White pastel can be used for highlights as it can be difficult to erase back to pure white paper.
4. As per earlier lessons, we will use a viewfinder to establish our composition, and help define the negative spaces.
5. Squint at your subject to reduce it to essential light and dark tonal sections for blocking in. Squinting eliminates differences which can make our drawing busy and contribute to failed tonal unity.
8. When looking through your viewfinder, take note of not only the objects but the shapes of cast shadows, shapes in the background, and the shapes created by the lit table surface.
9. These shapes are the base of our composition. We can define them with the faintest of line drawing using the side of the charcoal and then we can lay down the tone on top.
10. When composing, try to avoid having the same size shapes, as they can distract and dominate. Likewise, strong elements leading out of the edge of a picture can lead your eye out of the drawing.
11. We define all the shapes of tone to produce a two-tone image, while avoiding a piecemeal approach to the whole.
12. Some forms are best placed down as a broad block of tone, that can be erased into to reclaim the highlights.
13. Try to apply the tone in even strokes across the whole drawing.
14. Then apply a second tone, which is darker in a few places, producing a three tone world.
15. Finally, the darkest tone, which produces dramatic effects, as well as the subject matter. It has the greatest contrast, as well as the sharpest areas for the detail in this drawing.
16. The highlight areas need a couple of light tones to put down, before the highest light.
17. It can be much more efficient to erase highlights into a tonal bed than having to defend the light the whole way through the drawing.
18. Light can be cut onto edges, and highlights picked out.
19. A white table might not be the same whiteness the whole way across. White loses its intensity as it as it goes away from the light source.
Set up a simple still life of objects that are not too colourful or complex, white objects work well. Use a white drape on the table, light the setting with a spot light and draw the still life with tone, and very little detail. Use the view finder to compose your picture.
1. Draw with charcoal, then rub the whole drawing with the palm of your hand, and erase the light back into the drawing and re-introduce the darks.
2. Texture plays a big roll in the way we see light on objects. Choose some glass still life objects, and cut the light in with your eraser.
3. Leave the drawing early, don’t over work it. Many art movements of the last 120 years draw loosely without finishing the drawing with too much detail. This gives more abstract results.
4. Choose your subject. Draw only a few items of the still life to full tone, leaving the rest of the drawing under-drawn at the very earliest of stages.
Video Tutorial


Download the PDF of this Workshop