9/10 Rhythm (Preview)
Using various media to extract rhythm as an element from the still life.

LESSON PREPARATION
Getting ready to view the lesson
If you are watching the video tutorial on a computer (eg laptop, interactive whiteboard, digital projector) you can view the PDF resources on the screen.
If you are watching the video tutorial on a television, you may want to print the Workshop PDF on this page ahead of time, from your computer.
This lesson, Still Life 9/10, contains the following:
Still Life 9/10 Lesson Overview
Still Life 9/10 Activity
Still Life 9/10 Extension
Still Life 9/10 Posters (available in PDF)
These are posters of the finished artworks as created in the episode. You can choose to view this on the screen or whiteboard, you can print in black and white, or colour, or all of the above.
MATERIALS USED IN THIS LESSON
Graphite pencils, coloured pencils, willow charcoal, compressed charcoal, coloured dry pastel, kneadable and plastic or vinyl erasers.


EQUIPMENT USED IN THIS LESSON
Drawing board, clips, easel, view finder and spot light.


SUBJECTS USED IN THIS LESSON
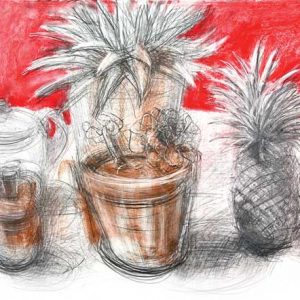
Assortment of pot plants with interesting shaped plants, pineapple, ceramic jug, metallic teapot. Feel free to choose objects on hand, or try our suggested virtual subjects.
1. Look at your subject, and try to see it in terms of rhythm and movement, a different way of looking. Try to see “rhythm” in the objects, and consider how you might draw them if they were wrapped in string. Can you see repetition of shape or line? Notice any circles or verticals?
2. Asking these questions will help you to see the subject differently, and approach your drawing in a different way instead of always focusing on recording detail and tone.
3. Try making constant contact with the page using a couple, or even a large bunch of pencils. This loose approach binds all the objects together. The feeling of volume and movement grows with this technique, as you move your pencils around the outside of each object. A large bunch of pencils forces you to work loosely, and the resulting drawing is dynamic, and full of movement.
4. The bunch could contain an 8B, or a black pastel pencil that can be pushed on to bring a stronger mark to a desired area.
5. Let the gestural lines do the all the work, be sure not to get in too close and illustrate. This broad approach helps capture the proportions in a forgiving manner, and rather than get caught up in drawing detail too early we can produce a flowing rhythmic style.
6. These loose exploratory line sit very well over a bed of tone you could set down before drawing. A pastel base can add dimension and can be erased into, to create interesting textures.
7. Despite the loose approach, we should still try to express the different subjects with marks that best describe them. Ceramic glaze is smooth and flowing, the plants are spiky or patterned.
8. With an adventurous spirit, lay down a bed of tone in the general area of one of the forms. Colour, charcoal, water colour tonal blocks can also work for you. Don’t be afraid to experiment!
9. Objects left lightly drawn will stay in the background. Stronger mark making will bring objects forward.
10. Weight is given to objects by massing lines and pushing harder underneath their form. Darker marks create weight. By contrast, we keep the top surfaces light so they don’t suggest weight.
11. Light lines are just as instructive as black lines. Remember that light can be cut in with an eraser or added with a white pastel. Erasing into the line work produces tone and emphasis which helps produce volume. A kneadable eraser can be pressed on to lift off the density of the graphite to create light but detailed tones.
12. We could leave the drawing at any stage. But in the spirit of adventure, challenge yourself to experiment with bold bright textures and colours that may surprise, and ignite your drawing with unexpected panache.
Set up a still life on a table that includes several objects, pot plants are great as they have the cylinder and the plant shapes to contrast. Use two or more pencils in a bunch, more can be held together with an elastic band. The aim is to keep constant contact with the paper while drawing.
1. Put down a block of dry pastel colour, erase into this to create some texture and then draw over the coloured area, with one red and one black pencil held together.
2. Place down a light charcoal drawing, erasing broadly across the light areas. Over this, draw with a bunch of pencils which include a colour, a pastel pencil and graphite pencils 2H, HB, 4B and 8B.
3. Weight is created with massed lines and line density. Draw some objects, and try to make them feel heavy by drawing light on top and dark underneath. Use a bunch of pencils with a broad range of tone.
4. Set up a large still life with many types of objects. Place on your page some blocks of dry pastel colour, these can be pushed and erased before you start to draw over the top with a large bunch of pencils. Further erasing with both kneadable and plastic erasers into the pastel and graphite will promote light and emphasis.
5. Our rhythmic, expressive, gesture-drawing will be pushed dramatically by the edition of a strongly coloured background. This could be dry pastel, but gouache or ink would work perfectly well. A torchon helps push pastel into the smaller spaces and makes the colour coverage more even.
Video Tutorial


Download the PDF of this Workshop