3/10 Perspective (Preview)
Exploring the way things get smaller as they go away, and creating the feeling of space in our drawing.

LESSON PREPARATION
Getting ready to view the lesson
If you are watching the video tutorial on a computer (eg laptop, interactive whiteboard, digital projector) you can view the PDF resources on the screen.
If you are watching the video tutorial on a television, you may want to print the Workshop PDF on this page ahead of time, from your computer.
This lesson, Still Life 3/10, contains the following:
Still Life 3/10 Lesson Overview
Still Life 3/10 Activity
Still Life 3/10 Extension
Still Life 3/10 Posters (available in PDF)
These are posters of the finished artworks as created in the episode. You can choose to view this on the screen or whiteboard, you can print in black and white, or colour, or all of the above.
MATERIALS USED IN THIS LESSON
Soft dark pencil, e.g. 4B – 8B, Eraser


EQUIPMENT USED IN THIS LESSON
Drawing board, clip, easel, paper


SUBJECTS USED IN THE VIDEO LESSON
White box, small chair
1. Perspective is a fundamental part of any still life drawing.
2. Your eye-line represents the horizon.
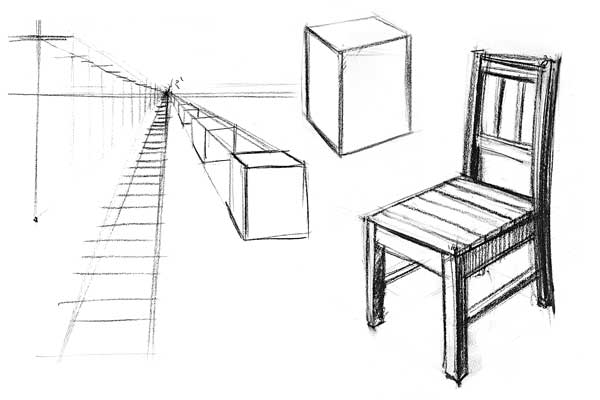
3. The Vanishing Point is where your subject is so small it vanishes into a point on the horizon (See Figure 1).
4. Objects below our “eyeline” (read: horizon) appear more open as they get closer to us, and we can see more into them (See Figure 2).
5. Single point perspective is not enough for wide landscapes. We will need to introduce Vanishing Point 2 to create Two Point Perspective.
6. Hold your pencil up in front of your subject, to see the angles you will need to draw. Lock your arm and swing around to your page, so your pencil keeps the same angle as your subject.
7. Your Angle of View determines how much you see into/on top of your subject.
8. Two Point Perspective describes how things get smaller in two directions.
9. For a bird’s eye view (e.g. top of skyscraper), or a worm’s eye view (e.g. looking up a tall post), we need Three Point Perspective. (See Figure 3)
10. Use a close Vanishing Point 3 for a dynamic drawing.
11. Use calipers to find your Vanishing Point, looking at your subject, lock your arm and swing around to your page, to transfer that angle to the page.
12. As you develop, you won’t need to draw in all the perspective lines, just the main ones.
13. You can apply the basics of Perspective to drawing any object.
First, draw a square box. Now play with your vanishing points – move them closer and draw the box again. Now, move them far away and
see what that does to your drawing.
Stack 2 boxes onto a chair and twist them to be at different angles to each other. Draw this still life. Now put them all on a table and draw again. Experiment by moving your vertical vanishing point.
Video Tutorial


Download the PDF of this Workshop